K3s Notes - Part 2
We continue with the tests in our small cluster with K3s built on the Raspberry Pi (RPI v3, RPI v4) that I have in my laboratory, for the tests we use the official K3s - Rancher documentation and also the official Kubernetes documentation.
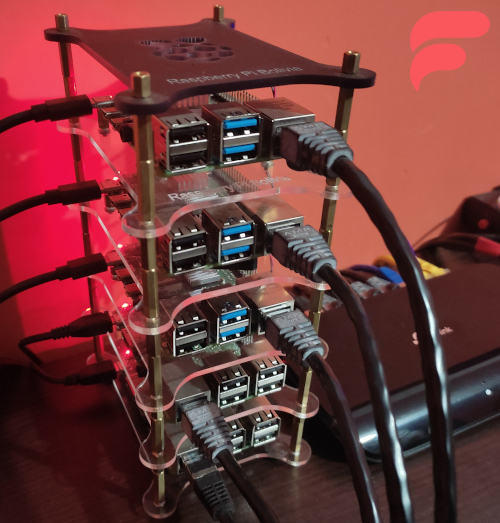
In the image we have as a detail:
- Three Raspberry Pi 4, Model B (1 Server Node and 2 Worker Nodes).
- Two Raspberry Pi 3, Model B (2 Worker Nodes,).
- One 8-port Tp-Link TL-SG1008D Gigabit Desktop Switch.
Basic concepts
With the Kubernetes components:
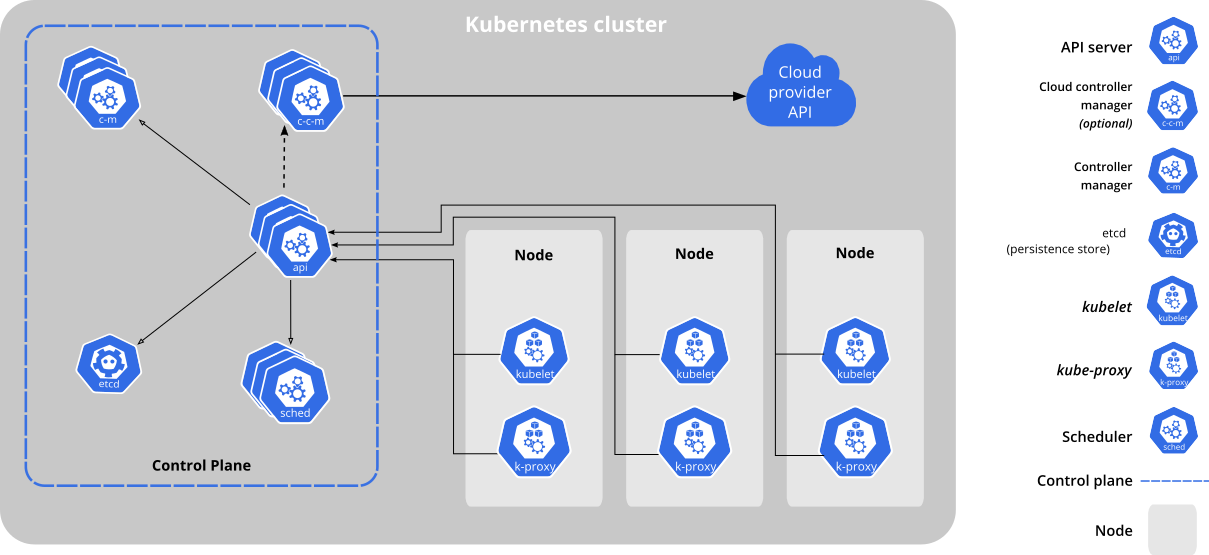
We can describe some important components:
-
kube-apiserver: The API server is a component of the Kubernetes control plane that exposes the Kubernetes API. The API server is the front end for the Kubernetes control plane.
-
etcd: Consistent, highly available key-value database used as the Kubernetes backing store for all data in the cluster.
-
kube-scheduler: A control plane component that searches for newly created pods without an assigned node and selects a node to run.
-
kube-controller-manager: Control plane component that runs controller processes.
- Node controller: Responsible for noticing and responding when nodes go down.
- Job controller: Watches for Job objects that represent one-off tasks, then creates Pods to run those tasks to completion.
- Endpoints controller: Populates the Endpoints object (that is, joins Services & Pods).
- Service Account & Token controllers: Create default accounts and API access tokens for new namespaces.
-
cloud-controller-manager: A Kubernetes control plane component that incorporates cloud-specific control logic (runs in a single process with kube-controller-manager).
- Node controller: For checking the cloud provider to determine if a node has been deleted in the cloud after it stops responding.
- Route controller: For setting up routes in the underlying cloud infrastructure.
- Service controller: For creating, updating and deleting cloud provider load balancers.
-
kubelet: An agent running on each node in the cluster ensures that the containers run on a Pod.
-
kube-proxy: It is a network proxy that runs on every node in your cluster, implementing part of the Kubernetes service concept.
-
container runtime: The container runtime is the software responsible for running the containers.
-
kube-scheduler: A control plane component that searches for newly created pods without an assigned node and selects a node to run.
Install Kubectl
In order to work with our K3s RPI cluster, we can work from the Server Node or install kubectl on our personal computer, in this case we will install the package for a GNU/Linux distribution, Debian Buster 10, adding the repository as follows:
 1# Update and install the necessary packages
 2$ sudo apt-get update
 3$ sudo apt-get install -y apt-transport-https ca-certificates curl
 4# We download the public signature key
 5$ sudo curl -fsSLo /usr/share/keyrings/kubernetes-archive-keyring.gpg https://packages.cloud.google.com/apt/doc/apt-key.gpg
 6# Add the official repository
 7$ echo "deb [signed-by=/usr/share/keyrings/kubernetes-archive-keyring.gpg] https://apt.kubernetes.io/ kubernetes-xenial main" | sudo tee /etc/apt/sources.list.d/kubernetes.list
 8# Update again and install the package
 9$ sudo apt install update
10$ sudo apt install -y kubectl
Kubectl Configuration with Cluster K3s
To work from our personal computer, we have to create a configuration file inside the .kube folder, the configuration file must have the name config, the folder and the file must be created with the appropriate permissions :
1$ mkdir ~/.kube
2$ touch ~/.kube/config
3$ chmod 775 ~/.kube
4$ chmod 420 ~/.kube/config
The content of the config file should look like this:
 1apiVersion: v1
 2clusters:
 3- cluster:
 4    certificate-authority-data: CERTIFICATE_CONTENT
 5    server: https://IP_OR_DOMAIN:6443
 6  name: default
 7contexts:
 8- context:
 9    cluster: default
10    user: default
11  name: default
12current-context: default
13kind: Config
14preferences: {}
15users:
16- name: default
17  user:
18    client-certificate-data: CERTIFICATE_CONTENT
19    client-key-data: CERTIFICATE_CONTENT_KEY
This data can be obtained from the Server Node, exactly the data is in /etc/rancher/k3s/k3s.yaml.
Testing After Installation
From our local computer we can execute the following commands:
1$ kubectl version
2# If there is a problem with the previous command we can execute:
3$ kubectl version --client=true
If everything is correct we will have an output similar to this:

Useful commands to start:
1# Get help
2$ kubectl --help
3# List all contexts in your kubeconfig file
4$ kubectl config get-contexts
5# List all available nodes
6$ kubectl get nodes
Articles K3s
Referencias
- Quick start
- Kube Dashboard
- Docs K3S
- Kubernetes Concepts
- Docs Kubernetes
- etcd
- Cluster Admin Access
- Cluster Accesss