Blog with Hugo Framework and Github Pages
For some time I was trying to create a personal blog, the first idea was to use a CMS known as Wordpress or Drupal but I didn't like any of them, then I used SPIP for a while where I could learn a lot about this French CMS, but keep a site of only publications with text and some images was not the most appropriate.

Then I was looking at the blogs of friends and the one that caught my attention was donkeysharp where Hugo Framework is used, a static page generator from default templates, it also uses Github Pages that allows you to create a static site in a user type usuario.github.io, it also allows you to create a site with a personal domain or subdomain in the form www.dominio.info or also blog.dominio.info, with this information I started to work on the new blog.
Github and Github Pages
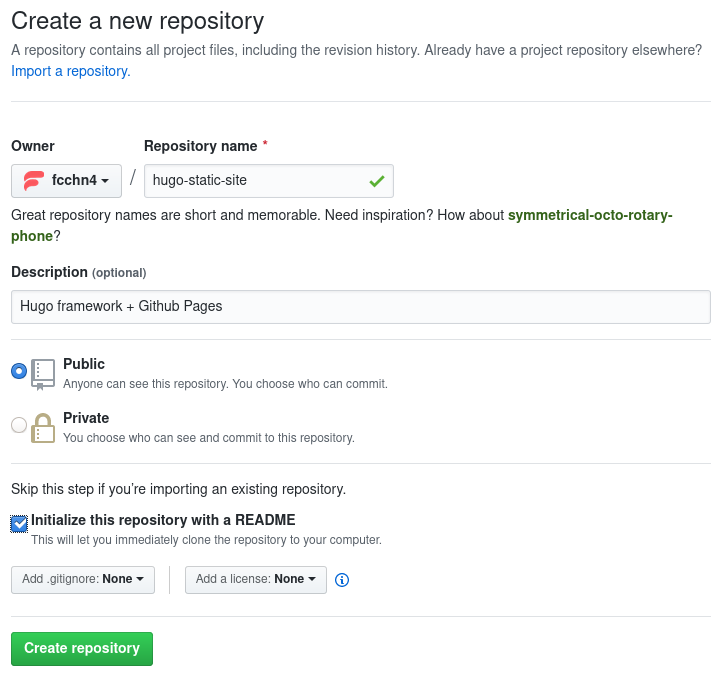
The first step was to create a new repository on Github, some guides recommend that the repository has the name of the form user.github.io, in my case just use a personal sub-domain.
- Creating the New Repository

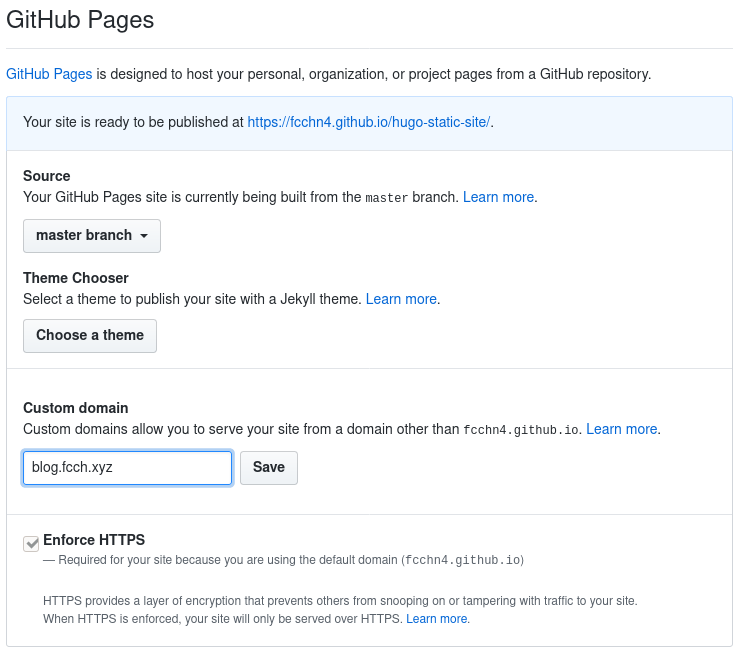
- Configuring the Repository

With these two steps completed we will have the repository and the subdomain with the user ready to work, in the case of the personal subdomain, the necessary records should be created in the DNS server.
Configuration DNS Bind9
Many use DNS servers from providers such as digitalocean or linode to manage their domain, in the case of using Bind9 the following records must be created:

You can check the new records with the following command:
1$ dig subdominio.dominio.info +nostats +nocomments +nocmd
Start Hugo Website
After creating the repository on Github, we must clone it, enter the repository and create a new development branch:
1$ git clone URL/repositorio
2$ cd hugo-static-site
3$ git checkout -b development
4$ echo public > .gitignore
5$ git push origin development
Then the master branch must be created that will be independent from the development branch, the master branch will be used to publish the site.
1$ git checkout --orphan master
2$ git reset --hard
3$ echo '<h1>Hello World</h1>' > index.html
4$ git commit -am "First index.html"
5$ git push origin master
6$ git checkout development
With the branches created and classified we can start with creating the templates with Hugo.
1$ cd ..
2$ hugo new site hugo-static-site --force
3$ cd hugo-static-site
The public directory must also be made to reference the master branch.
1$ git worktree add -B master public origin/master
To initialize the new site we install a theme of our preference, for the example we will use the goa theme.
1$ git submodule add https://github.com/shenoybr/hugo-goa themes/goa
We add the new theme to the config.toml file.
1$ echo 'theme = "goa"' >> config.toml
We create the new and first post.
1$ hugo new posts/first-post.md
And make sure that in the created file it is marked as draft: false so that it can be published.
With all of the above we can make a preview of everything worked with the web server provided by Hugo.
1$ hugo server --watch -D
When we verify that everything is fine, we start the generation of the site.
1$ hugo -D
The above command creates the static files in the public directory.
With the static files generated, we upload the changes made to Hugo to the development branch.
1$ git add .
2$ git commit -m 'Initialized hugo site'
3$ git push origin development
Since the public directory points to another branch: master, we must upload the static files as well.
1$ cd public
2$ git add .
3$ git commit -m 'publishing first-post'
4$ git push origin master
With these last steps we should have a website working in the subdomain configured in Github Pages or with the personal subdomain.
Clone Repository
1$ git clone -b nombre_branch --recurse-submodules URL/repositorio
2$ cd repositorio
3$ mkdir public
4$ git worktree add -B master public origin/master
Delete Submodules
1$ git submodule deinit -f -- ruta/nombre_submodulo
2$ rm -rf .git/modules/ruta/nombre_submodulo
3$ git rm -f ruta/submodulo
4$ git submodule status